If you click to purchase a product or service through our independent recommendations and unbiased reviews, we may earn a commission. Learn more.
We were pleasantly impressed by how to install WordPress with Bluehost. Because it’s so simple. All you have to do is sign up, and Bluehost will take care of the rest. In this tutorial, we’ve broken down our experience so that you may do it as well.
Don’t worry. There will be no technological jargon!
We know Bluehost inside and out after hours of hands-on testing and research. However, we have also consulted with other Bluehost users as well as some professional WordPress developers to provide you with the finest tutorial on How to Install WordPress With Bluehost.
Choose a Bluehost plan
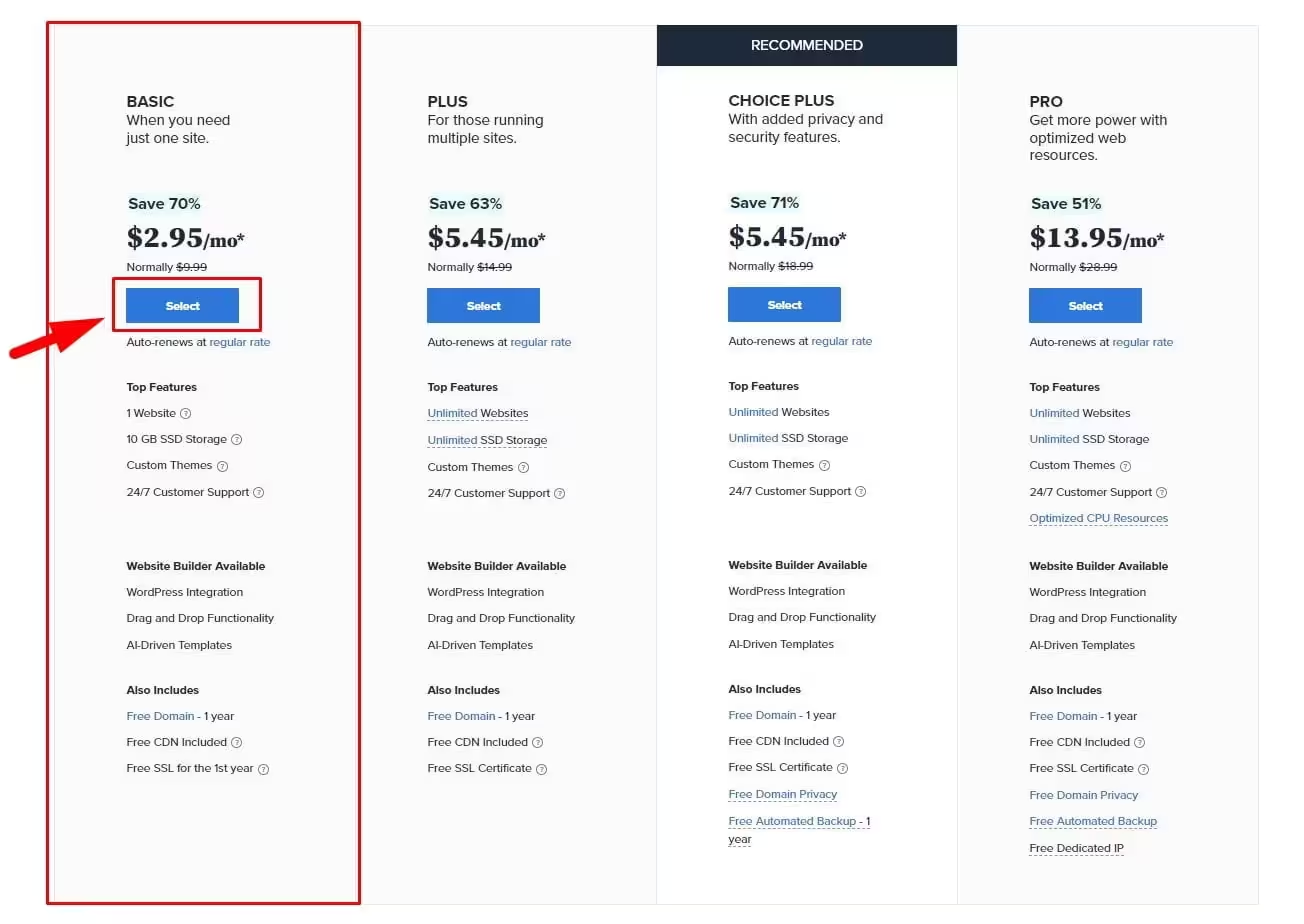
Select a Bluehost Hosting Plan
Visit Bluehost.com and select the most appropriate pricing plan for you.
Here are the Bluehost discounted pricing details for Best Info Lab Readers:
🔥 12 Months: $2.95/Month
🔥 36 Months: $4.95/Month
Bluehost is well-known for its WordPress hosting services, and it is even an official WordPress recommended host. To choose a plan Go to Bluehost’s WordPress hosting and scroll down to the “Get WordPress hosting that fits your ambitions.” section to get the best plan for you.
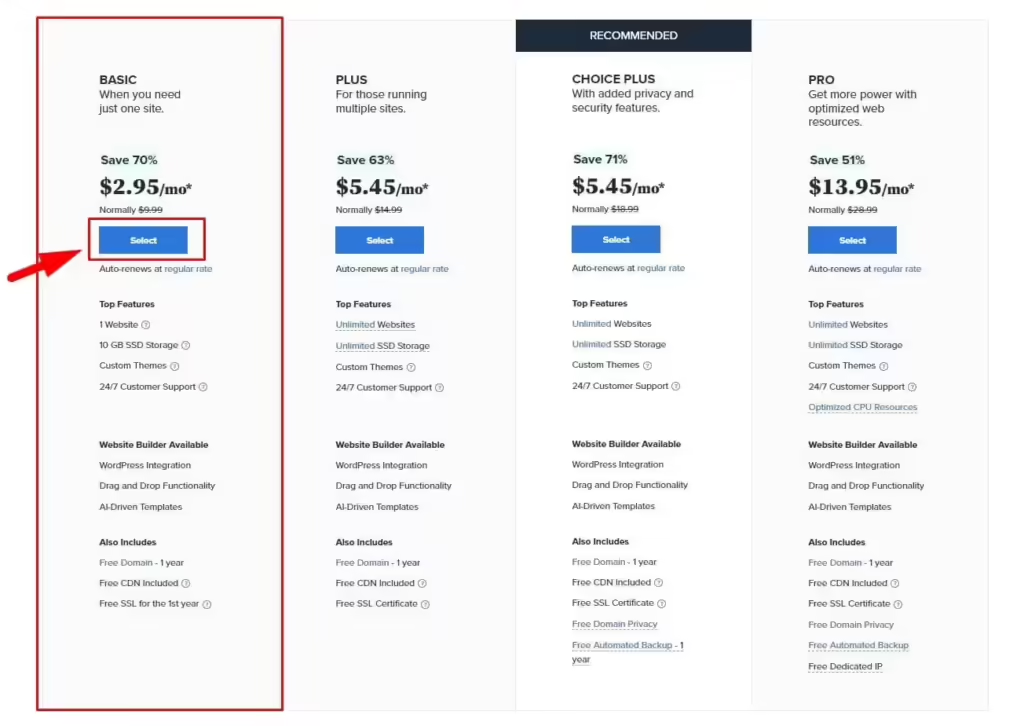
Our recommendations are,
- The Basic ($2.95/month) plan is ideal for new or modest websites. You’ll have a lot of bandwidth and storage to start with for a very low cost. You can host only 1 website with this Basic plan and you’ll get 10 GB SSD storage.
- The Plus ($5.45/month) plan is ideal for expanding websites that are adding more content and seeing increased traffic. And if you need to host more than one website, then you can go for Plus Plan. Bluehost plus hosting offers you to host Unlimited Websites and Unlimited Storage.
- The Choice Plus ($5.45/month) plan is almost similar to the Plus Plan. You’ll get Free Domain Privacy and Free Automated Backup features in this Bluehost Choice Plus hosting plan. This plan also offers to host Unlimited Websites and Unlimited Storage.
- The Pro ($13.95/month) plan is designed for large websites with well-established visitors, particularly eCommerce sites that require greater protection to accept payments. You’ll get Optimized CPU Resources and a Free Dedicated IP in this plan.
Check out our Bluehost Pricing review for a complete breakdown of the various plans on offer.
Once you’ve decided on a plan, bear in mind that the super-low price you’re seeing only pertains to the first term — when it comes time to renew, you’ll have to pay a higher renewal fee.
This is standard practice for most hosting companies, but it might be a shocker if you aren’t expecting it!
Bluehost’s pricing difference between introductory and renewal periods isn’t very large:
- The monthly cost of the Basic plan rises from $2.95 to $9.99.
- The Plus plan goes up from $5.45 to $14.99 per month.
- The Choice Plus plan goes up from $5.45 to $18.99 per month.
- The monthly cost of the Pro plan rises from $13.95 to $28.99
Bluehost is extremely popular for all of the newbie bloggers. Because they are offering a huge savings and discounts during sign up for first term. Only $35 for 1 year is extremely cheaper and affordable. Plus you are saving a $10 for domain. Bluehost won’t charge for your domain for first year. So, what are you waiting for? Sign Up today with our special link to get 1 year hosting for just $35 only!
Select Your Domain Name
Have a Domain Name
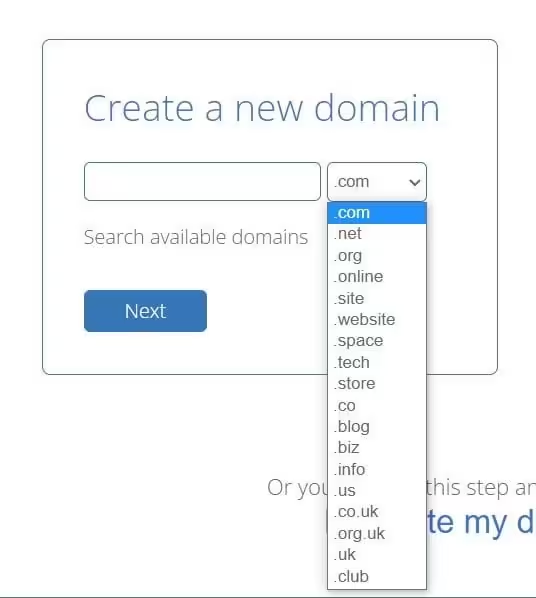
Choose a new domain for your website or reuse an existing one. You should grab the Bluehost’s Free Domain Opportunity. Get a Free Domain from the search box “Create a new domain”
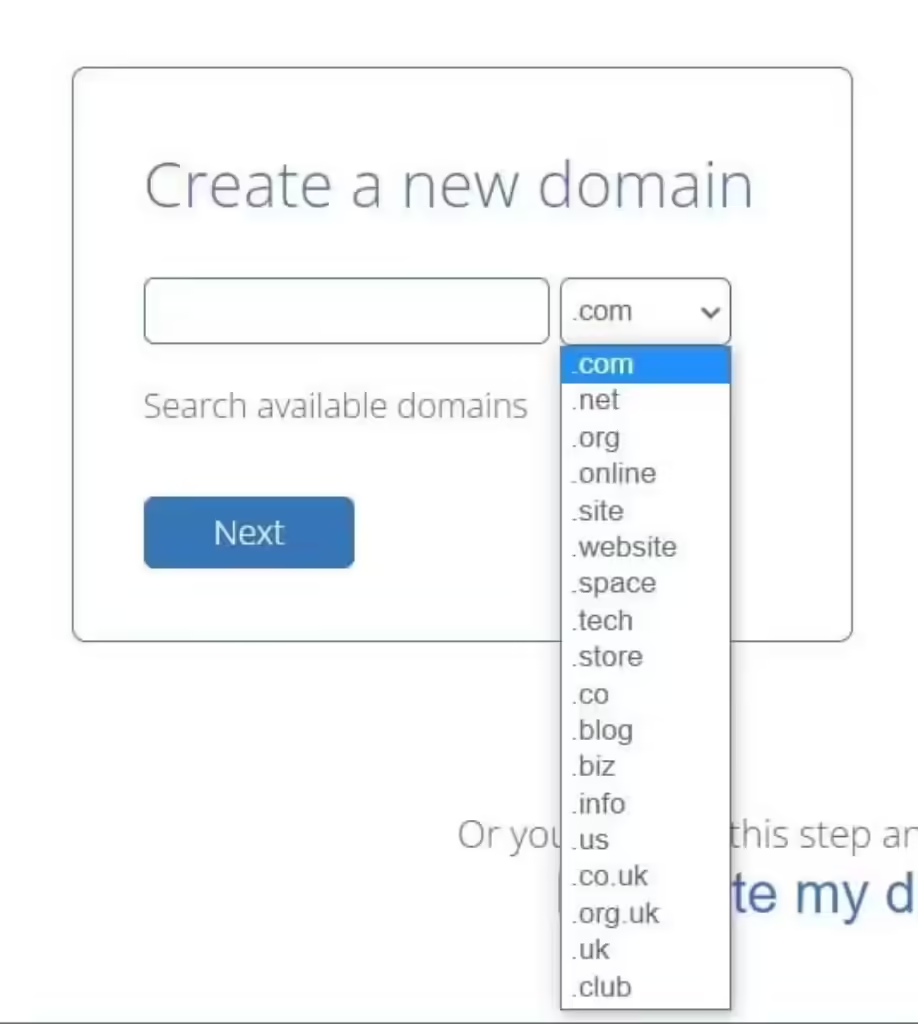
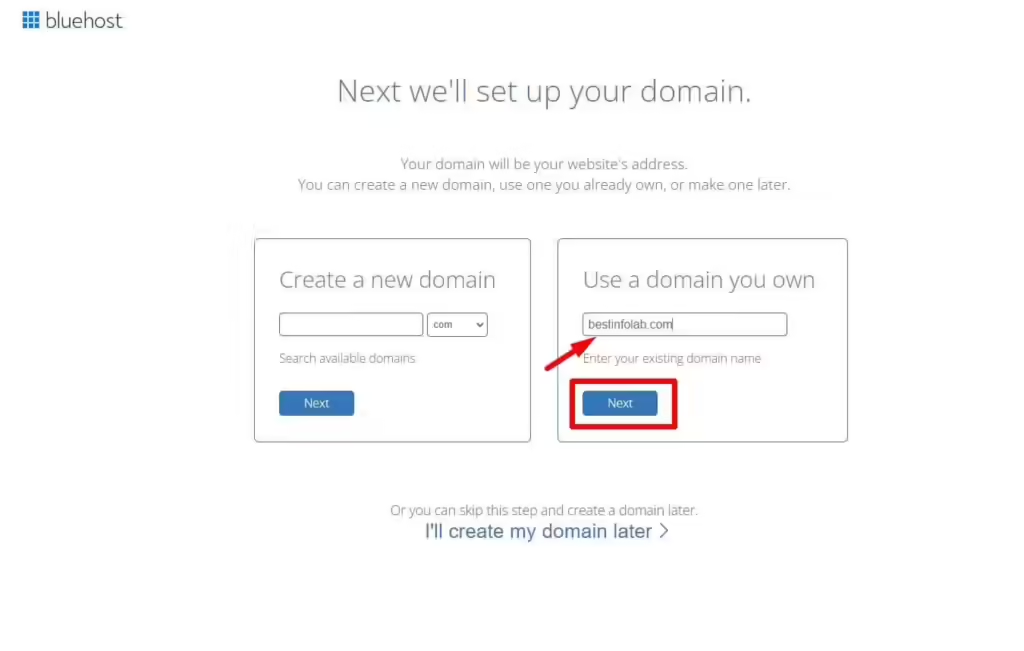
In the journey of how to install WordPress with Bluehost, after you’ve chosen a plan, you’ll be asked to pick a domain for your site, which is essentially the “address” where others can discover your site on the internet. If you already have a domain name that you wish to use, you may input it now.
You can also select your domain name extension from the drop-down box under “Create a new domain” (like .com, .net, or .org).
If you’re having problems coming up with a new domain name, don’t worry — you can skip this step and return to it later!
Whether you already have the ideal domain or are still thinking about it, make sure you register it before someone else does!
Sign up
Bluehost Sign Up Process
Enter your address and payment information, then purchase your Bluehost plan – just keep a lookout for unnecessary fees!
You’ll be able to check out your new Bluehost plan once you’ve picked a domain name.
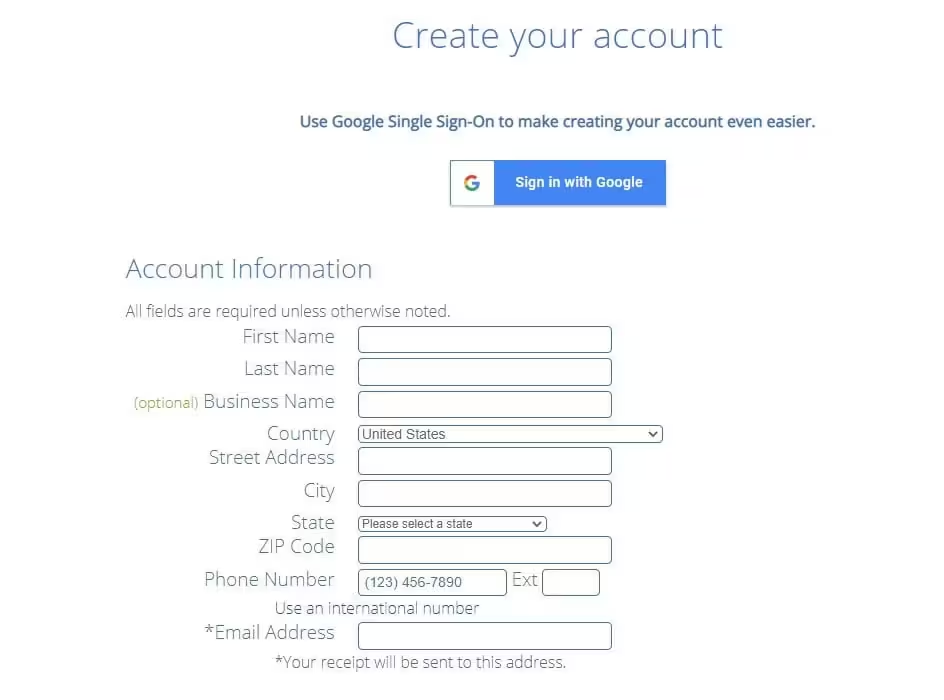
Bluehost will ask you to provide your name, address, and payment information on this last page. You’ll also have to mention the hosting plan you want and how long your first term will run.
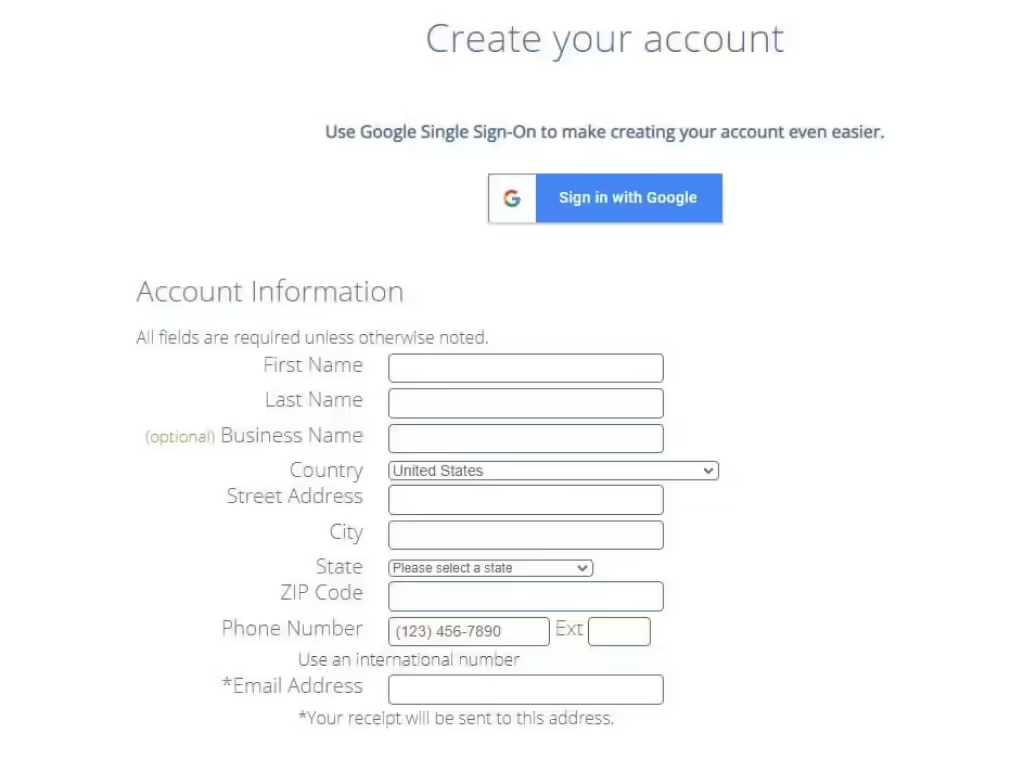

Did you notice that you’ll getting 1 year web hosting for just $35 only?
Click here to get started with Bluehost discounted pricing exclusively for Best Info Lab readers.
✅ Avoid spending money on things you don’t need. You’ll notice a “Package Extras” area on this checkout page.
✅ You’ll also note that a few add-ons, such as Codeguard Basic and SiteLock Security, are immediately added to your shopping cart. These tools are good to have. You might want to buy them, but they are not essential!
✅ Take a close look at the Package Extras section and uncheck any extra expenses that you do not want.
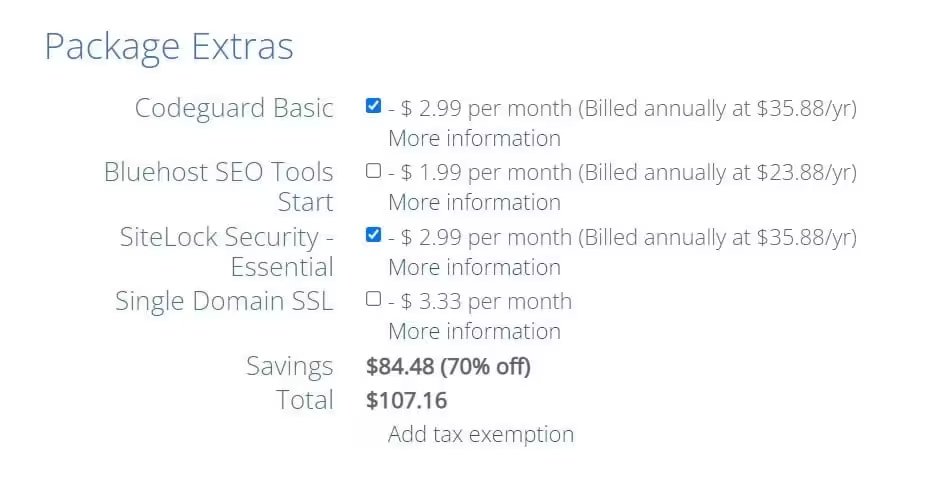
After entering and reviewing your information, and unchecking any expenses you don’t want, just click the green “Submit” button at the bottom of the page, and you’ll be the happy owner of a new Bluehost account.
Log In and Install WordPress
How to Install WordPress with Bluehost
Log in to your Bluehost dashboard and install WordPress with a few simple clicks.
At this stage of how to install WordPress with Bluehost, you’re ready to install WordPress on Bluehost. Finally. This may be the simplest stage of the entire process because Bluehost offers free 1-Click WordPress installation, so you won’t have to do any technical work yourself.
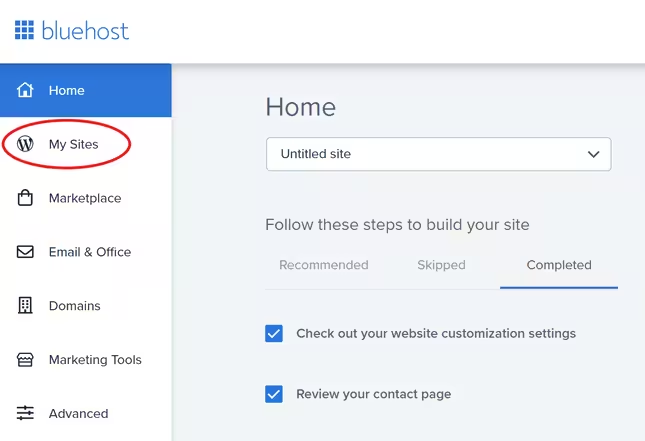
Simply login into your Bluehost account and select the “My Sites” link from the left side menu:
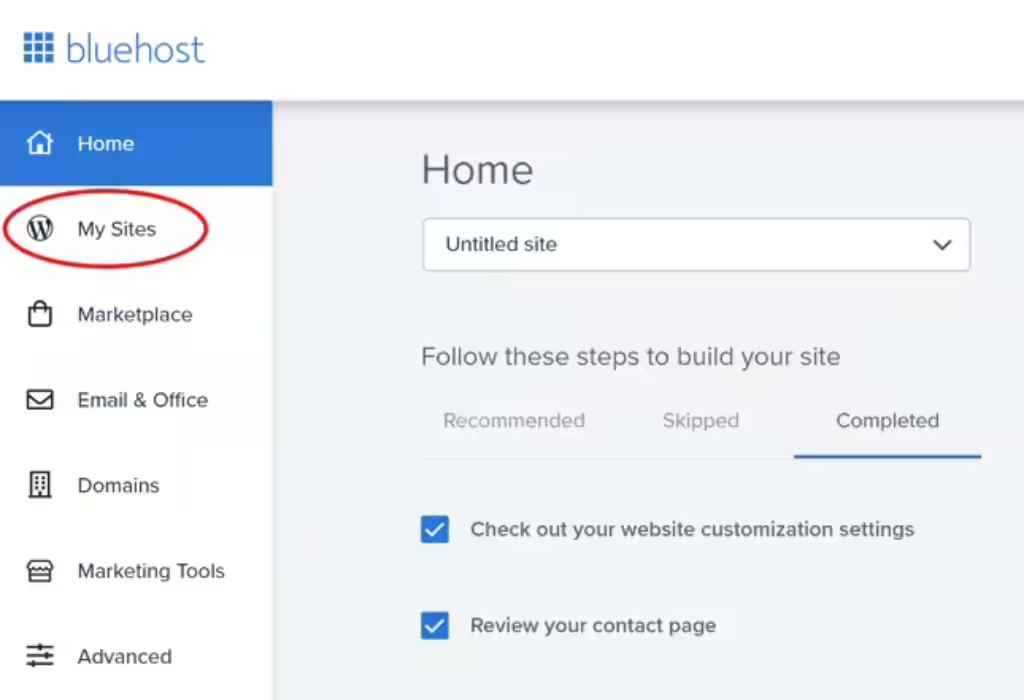
On the following screen, click “Construct Site” in the upper right corner, and then select whether you want to use the WordPress.org content management system or the WordPress.com website builder to create your site.
(Because you have your own hosting provider, WordPress.org is the better alternative for you.)
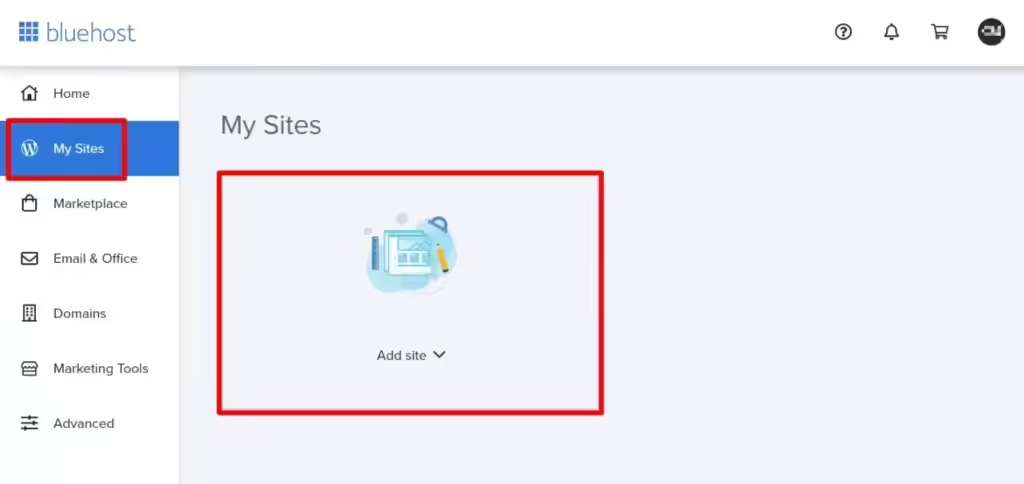
After selecting a WordPress option, you’ll input a name and tagline for your site, which will serve as an introduction to most visitors:
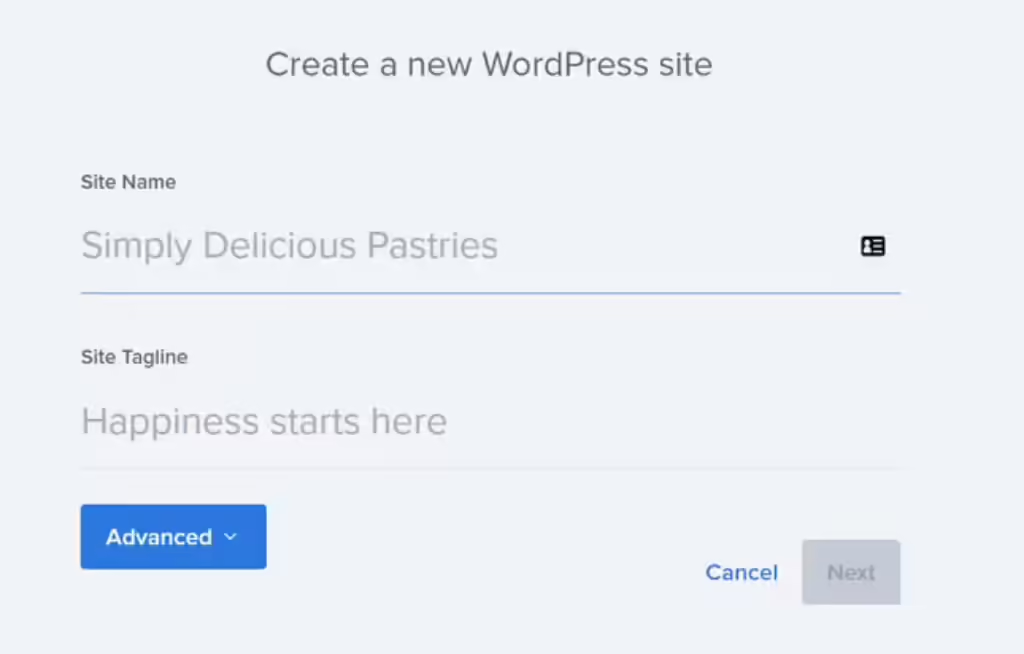
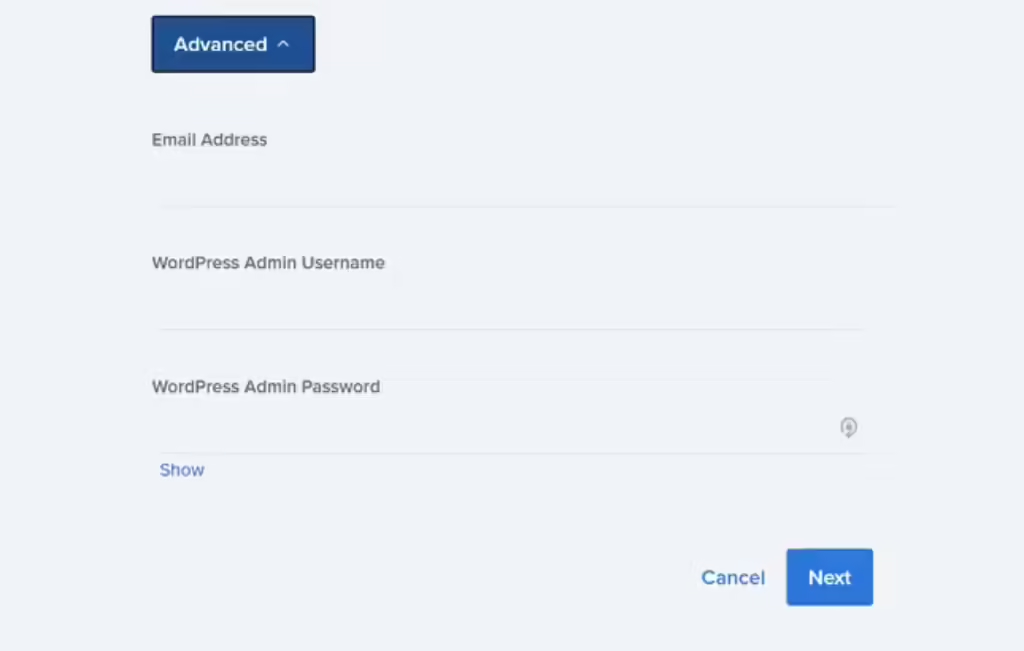
Then, click on the “Advanced” tab and input the login details for your WordPress account.
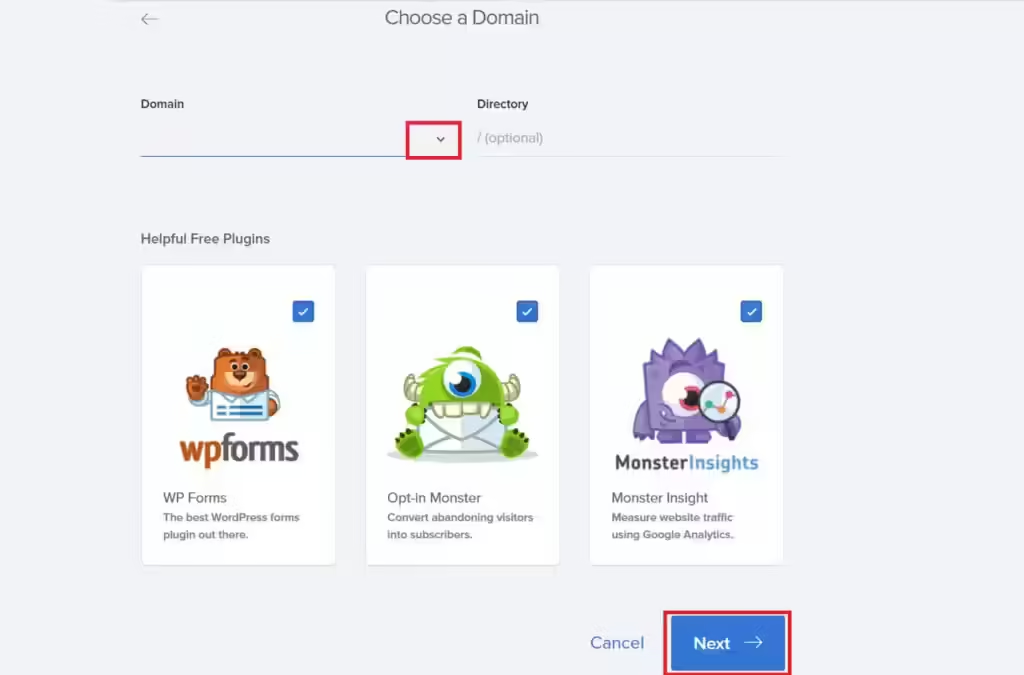
Bluehost will next offer several options (and free this time!) WordPress plugins that you may choose to install at this point.
WP Forms, for example, is excellent for developing basic surveys and contact forms via which visitors can stay in touch with you, while MonsterInsights is a tool that connects with Google Analytics to help you evaluate your traffic.
Go to “Search Appearance,” then “Taxonomies” if you’re using Yoast SEO. Then specify that “Categories” and “Tags” should not be displayed in search results. These are often referred to as “thin pages,” which may result in a Google penalty.” you don’t want that right?
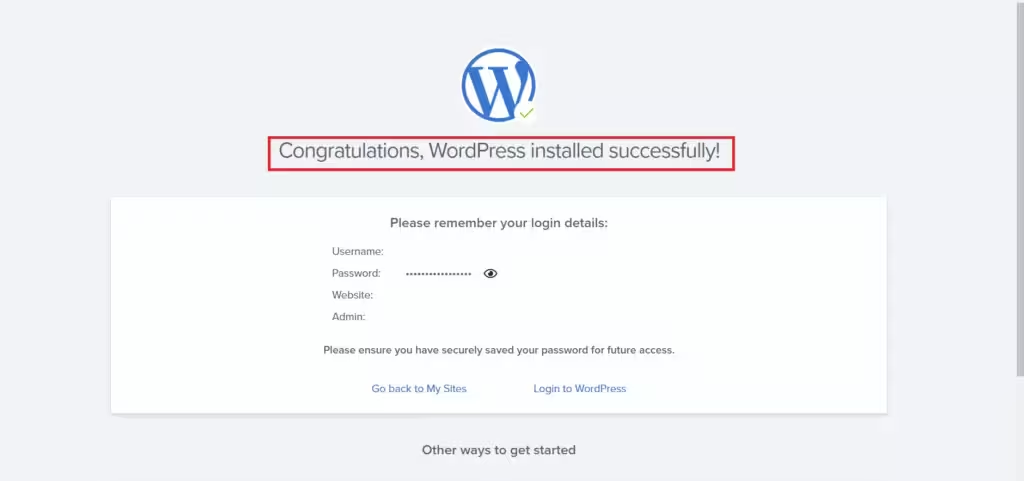
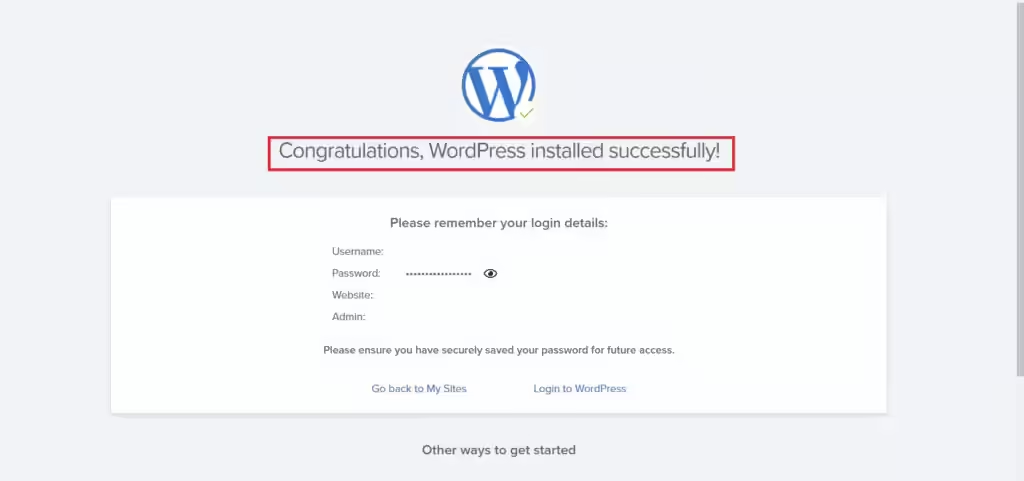
Whether you use plugins or not, you’ll then click “Next” at the bottom of the page, and voila! You’ve installed WordPress with Bluehost successfully.
Confused?
It’s really a straightforward process of How to Install WordPress With Bluehost, so you should have no problems. However, if you do have any problems or inquiries, Bluehost’s support team is available 24 hours a day, 7 days a week – and we were extremely satisfied with their service.
Bluehost received a perfect 5/5 for help and support in our web hosting study, and it exceeded our expectations the most of any service we examined.
Bluehost’s live chat support was extremely attentive. Their searchable knowledge library was chock-full of helpful articles and advice.
Site Launch
Site Launch
Log in to WordPress from your Bluehost dashboard and begin designing your site.
Congratulations! WordPress is now installed on your Bluehost account. It’s now time to design your website and have it ready for visitors.
Return to the “My Sites” page and then click on “Manage Site.”
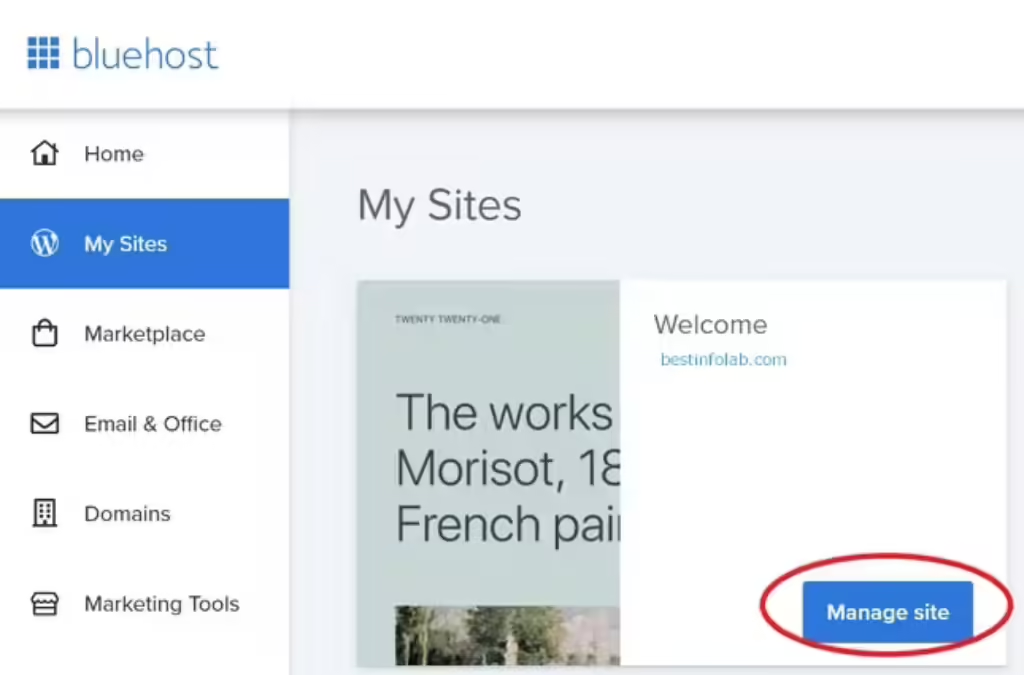
Click “Login to WordPress” on the following screen.
You’ll be transported to your WordPress dashboard, where you can begin customizing your site. This is where you may alter the layout of your site (or use a pre-built theme if you want), build various pages, and create fresh material for blog entries or news updates.
Don’t worry about the appearance of your work-in-progress. at this time, anyone attempting to visit your site will get a “Coming Soon” sign, so you may have fun experimenting before you really publish your site.
When you’re ready to go live, simply go to the WordPress dashboard and select “Launch your site.” so don’t worry about launching too soon — it doesn’t have to be permanent!

It doesn’t take long to turn your dream website into a reality with Bluehost.
Switching a WordPress Site to Bluehost
Optional: Migrating a WordPress Site to Bluehost
This section is for you if you already have a website hosted someplace else and are thinking about migrating to Bluehost.
Bluehost provides free migration for most WordPress websites. making it simple to transfer to Bluehost in most circumstances. If your website isn’t eligible for the free migration, you may either convert it to Bluehost yourself or pay Bluehost to handle it for you.
To see how it works, click on the item that interests you below:
Using Bluehost’s Free Migration Service
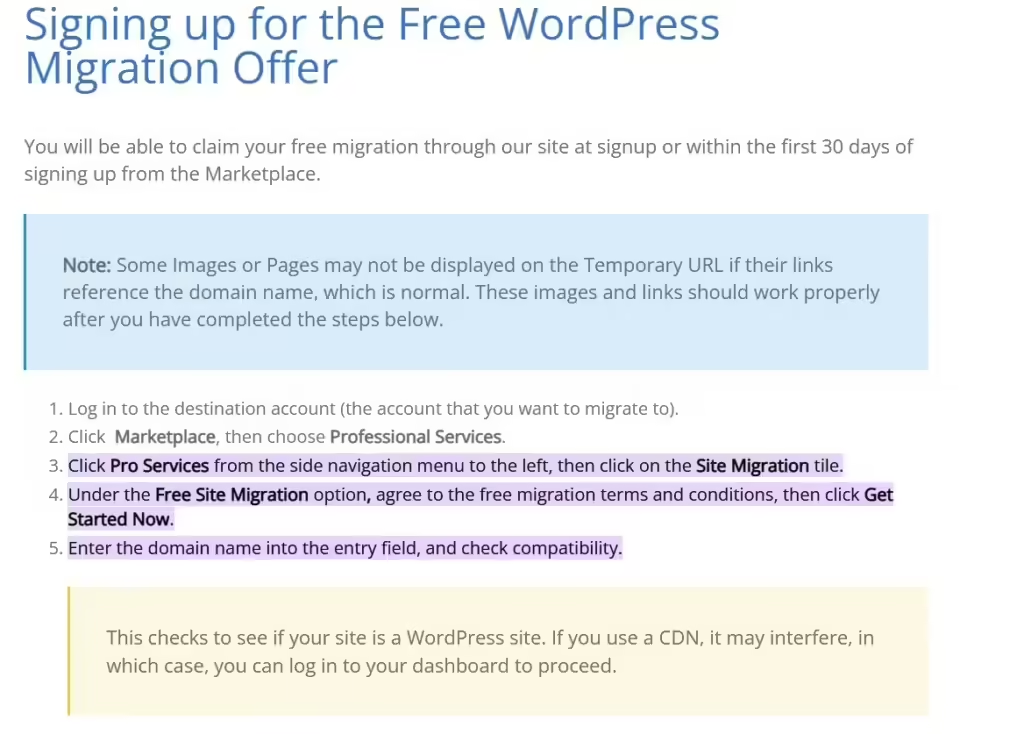
If your existing domain points to a WordPress site, you may use Bluehost’s free migration service.
Your website is of average size and operates a current WordPress version with plugins.
To put it another way, most WordPress sites will be qualified for the free transfer (Bluehost will do a compatibility check to ensure this!). Then, all you have to do is install the Bluehost Migration plugin, and the team will handle everything else!
Manually Migrating to Bluehost
If you don’t qualify for a free migration – for example, because your site is too large – and don’t want to pay for a transfer, you may migrate your website to Bluehost yourself.
This isn’t the simplest solution, but if you’re prepared to put in the effort, it’s not too difficult!
Simply save all of your website’s files and information on your computer and then upload them to your new hosting account.
Use of Bluehost’s Paid Migration Service
If you don’t qualify for a free transfer but don’t want to deal with the trouble of migrating a site yourself, Bluehost offers a paid migration service for a one-time price of $149.99. You can really move up to five websites and 20 email addresses for this amount.
All you have to do is purchase the transfer service, and Bluehost’s experts will handle everything else as soon as possible.
Check out our detailed Bluehost review to determine whether this host is perfect for you.
Summary
Wrap Up: How to Install WordPress with Bluehost

You’ll be able to check out your new Bluehost plan once you’ve picked a domain name.
Bluehost will ask you to provide your name, address, and payment information on this last page. You’ll also have to mention the hosting plan you want and how long your first term will run.
Everything you need to know is right here — it’s time to get started!
Still wondering if Bluehost is right for you? No need to worry. our comparison guide to the Best Web Hosting will show you how Bluehost compares against the competition. Don’t forget to leave a comment if you have any question. Happy blogging!
FAQs
How to Install WordPress with Bluehost: FAQs
Is WordPress available for free on Bluehost?
Is it necessary for me to run WordPress with Bluehost?
I didn’t select a domain name when I signed up. How can I purchase one later?
How do I install WordPress on Bluehost for free?
- Access your Bluehost cPanel account.
- Locate the Website section and choose Install WordPress.
- Select the Install option.
- Select the domain name to which you want to publish it.
- You can change the email address, username, and password for the new WordPress installation if necessary.
