How To Start A Blog In 2024 And Earn Over $8,317 Every Month From It
(Step By Step Process)
Do you intend to create a new blog from the bottom up? You’ve come to the right place. expanding a blog to make $10,000 or more per month is achievable.
but the problem is Starting a blog is incredibly simple, but profiting from it is not.
In this extensive tutorial, you will not only learn how to build a WordPress blog in 2024, but you will also learn PROVEN ways to profit from it.
We’ve launched and grown a ton of blogs over the previous years, so we know how to properly create a site that actually receives more visitors and produces reasonable revenues. The blog you’re reading gets over $8,317 per month from affiliate sales. Here’s your one-stop-solution for learning how to start a blog in 2024 and start generating $8,317 or more per month from it.
So, do you want to know how to start a blog in 2024? Let’s get into the basics.

Our Journey with this Blog
Do you want to make something meaningful? Why don’t you start your own blog? One of the finest decisions we ever made was to start this blog. After all, this is how we make a livelihood. More importantly, it is how we contribute value to the lives of others.
So you’re thinking of beginning a blog but don’t know where to begin, right? What’s more, neither did we! We intended to establish a blog before we became “Best Info Lab” to convey our views and express our reviews, but we were overwhelmed with choices.
When should we begin? How do we go about registering a domain name? What exactly is hosting? What platform should we choose for blogging? How do we decide on a blog theme? What exactly is a plugin? What topics should we write about?
But there’s good news: creating a blog is a lot easier than you think. We’ve learned a lot of things along the way to reaching millions of readers, and you can now benefit from our pain and suffering to avoid most of the trial and error required in starting a blog.
How To Start A Blog In 2024 In 6 Easy Steps


This is the only manual you’ll ever need to start and earn from a blog in 2024. It is a full instruction on how to start a new blog, so grab a cuppa and let’s get started.
Let’s start with the 6 simple steps to building a successful blog.
Step 1: Pick a Profitable Niche
Thousands of new bloggers to ask us all the time, “How should I choose a niche for my blog?”
As a newbie, that is a legit thing to ask. The success of your blog is determined by the niche you choose.
Unfortunately, the majority of folks get this one item wrong. They either choose a mammoth topic or not something they swear by kinda niche. That is why 99 percent of new bloggers fail!
If you don’t want that to happen to you and are seeking for some surefire techniques to choose a money-making niche, here are three solid suggestions.

Focus On ONE Topic Only
When selecting a specialty, avoid general notions such as “Make Money Online.”
Why? Because there are millions of websites dedicated to the same subject. So, even if you develop amazing material, it will be exceedingly tough to win due to the tremendously high competition.
Instead, target specific keywords such as “Make Money with Blogging”.
Need some niche prompts? Try these.
- Make Money Online
- Outdoor or Travel
- Fitness
- Personal Development Vs. Self-Help
- Relationships
- Lifestyle
- Real estate company

Make sure –
- You enjoy working with your niche
- People are interested in reading and pay on the topic of Your skill with your niche.
Use The “777 Method” for Niche Selection
Smart Passive Income’s Pat Flynn created the “777 approaches” for niche selection. It is useful for anyone looking for a successful niche concept.
The 777 technique works as follows-
- Take out a piece of paper and make a list of your seven interests, seven challenges, and seven anxieties of yours.
- Choose any ten concepts from the list of 21 that you believe are "worthy" and "evergreen."
- Then, enter each of these niche ideas into a keyword research tool like Semrush to generate a list of profitable keywords for a new blog.
Find a Problem and Create a Website Around It:
The easiest method to start a lucrative blog is to identify an issue that needs to be solved.
Consider all of the challenges you are currently experiencing or may face in the future.
You can think about challenges in terms of relationships, making money online, college, profession, family, and so on. The options are limitless.
You should now have a plethora of topic ideas or keywords to base a NEW blog on.
What’s the best part? You’re going to start a blog to answer a specific problem! You are in control.
Step 2: Choose A Domain Name And Hosting for Your Blog
Choosing the appropriate domain name for your website is critical to its success. If you pick the wrong domain name, it might be difficult to change it afterward without harming your brand or search rankings.
The second stage in beginning a profitable blog is to choose a memorable domain name that is simple to remember and type.
When most first-time readers visit your blog, the first thing they notice is your domain name.
It not only makes a nice first impression, but it also has an influence on SEO, sales, conversions, and so on.
That is why you must select the ideal domain name from the start. Follow these steps to find your perfect domain name match.

8 Quick Tips To Choose A Domain Name
1. Stick with .com
Today, there are several different domain name extensions available, ranging from the original.com, .net, and .org to specialist extensions such as. Hotel, photography, and even pizza.
We always recommend that you choose a .com domain name.
2. Use Keywords in Your Domain Name
Keywords are very essential in a domain. By adding keywords in your domain name, you are informing search engines about the purpose of your website. Keywords in your domain, together with great content and a positive user experience, can help you rank better on Google.
3. Keep Your Domain Name Short
While keywords are essential, don’t go too far with your domain name. It is preferable to have a domain name that is both short and memorable.
We recommend that your domain name be no more than 15 letters long. Longer domain names are more difficult for your visitors to remember.
4. Make Your Domain Name Easy to Pronounce and Spell
When speaking and writing, you should be able to effortlessly convey your domain name. You never know when you’ll be approached in-person to share your domain name.
If you intend to use your domain name to generate a professional business email address, it must be simple to grasp and spell for any listener.
5. Keep it Unique and Brandable
Your blog domain name must be different for you to stand out in the eyes of your visitors. It’s a good idea to look into other blogs in your niche and see what domain names they’re using.
You don’t want to mistakenly use a trademarked name or be accused of plagiarism by another blogger.
6. Avoid Hyphens and Numbers in Domain Name
Never use hyphens in a domain name. Hyphens might be an indicator of spam domains with which you do not want to be linked.
Typos are very common in hyphenated domains. If you use hyphens in your domain name because the domain you desire is already occupied, your customers will most likely land up at your competitor’s site if they fail to fill in the hyphen.
7. Use Domain Name Generators
There are currently over 360 million registered domain names. As a result, many individuals believe that all decent domain names are already taken.
Manually searching for specific domain names might be quite tiresome. We suggest Nameboy, one of the oldest and most popular domain name generating tools available online.
You can also use tools like Domains Bot, Panabee, Name Station, Bust A Name, Instant Domain Search.
You may also read our detailed guide on selecting a memorable domain.
8. Act Quickly Before Someone Else Takes it
After you’ve decided on a domain name, the following step is to choose a reputable web host.
We strongly advise you to go with Bluehost. It’s not just a cheap web server, but it’s also a WordPress-recommended web host. It’s also utilized by over 2 million websites throughout the world.
Here’s how to get a free domain name and start a blog with Bluehost.
1. Start Your WordPress Blog:
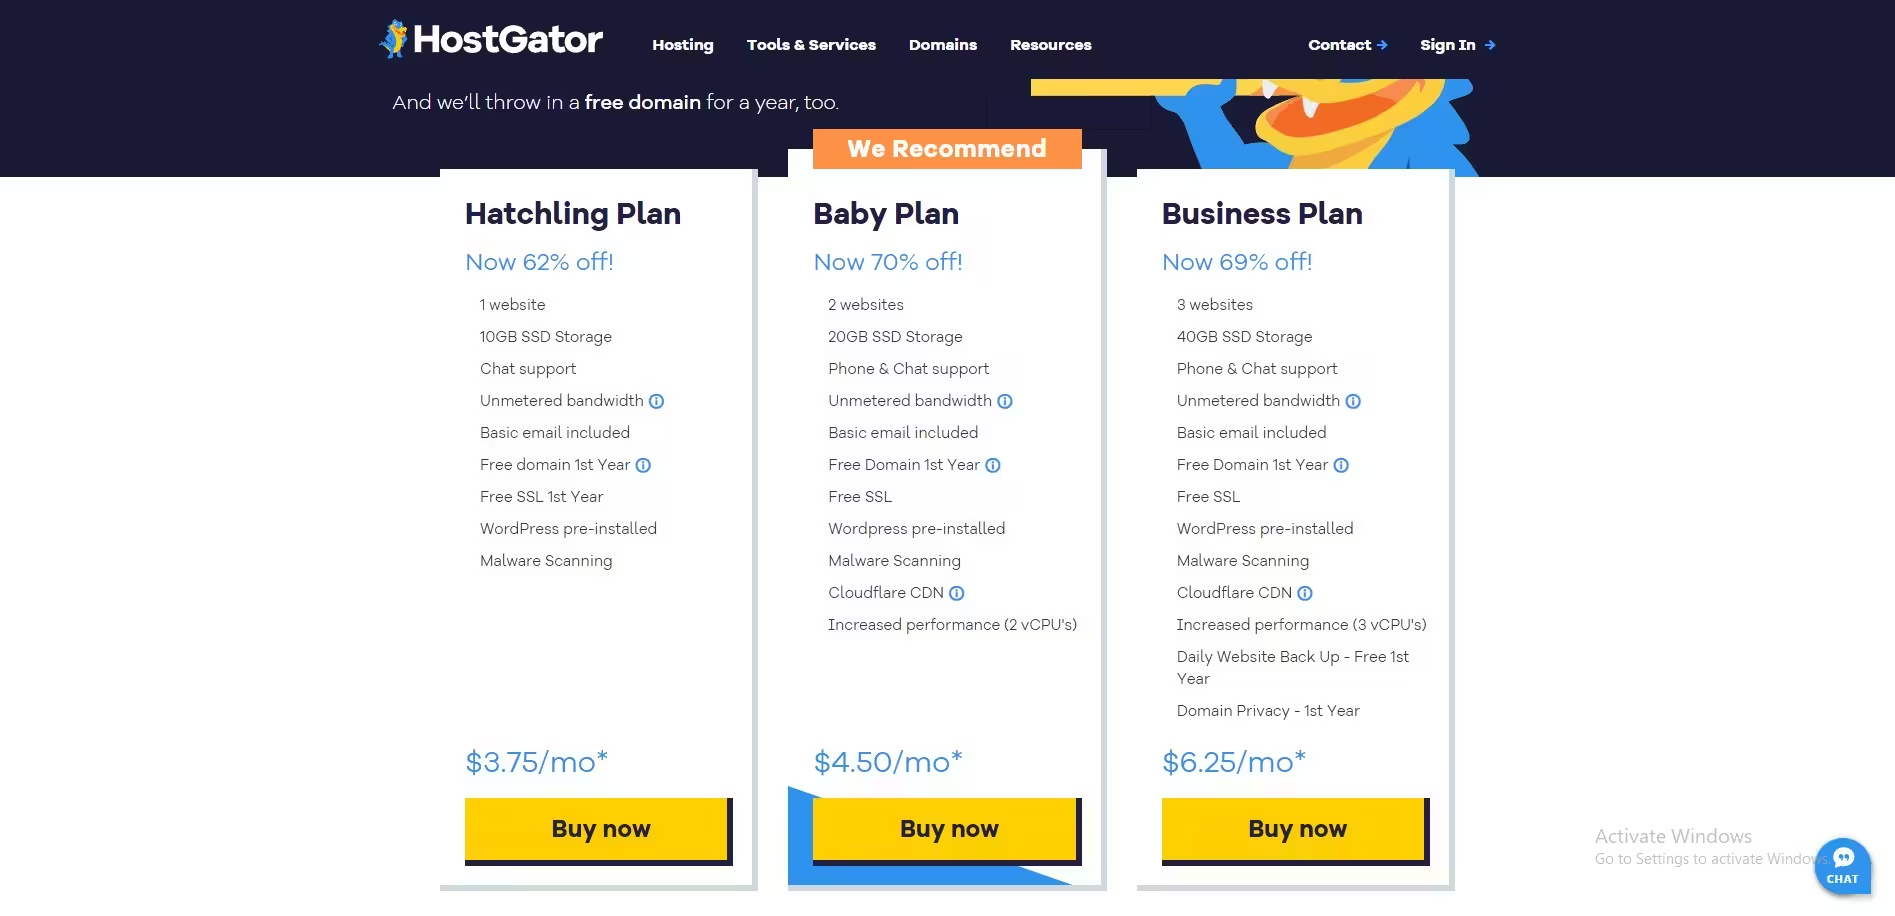
Get started with a beginner-friendly web hosting solution like Bluehost or HostGator.

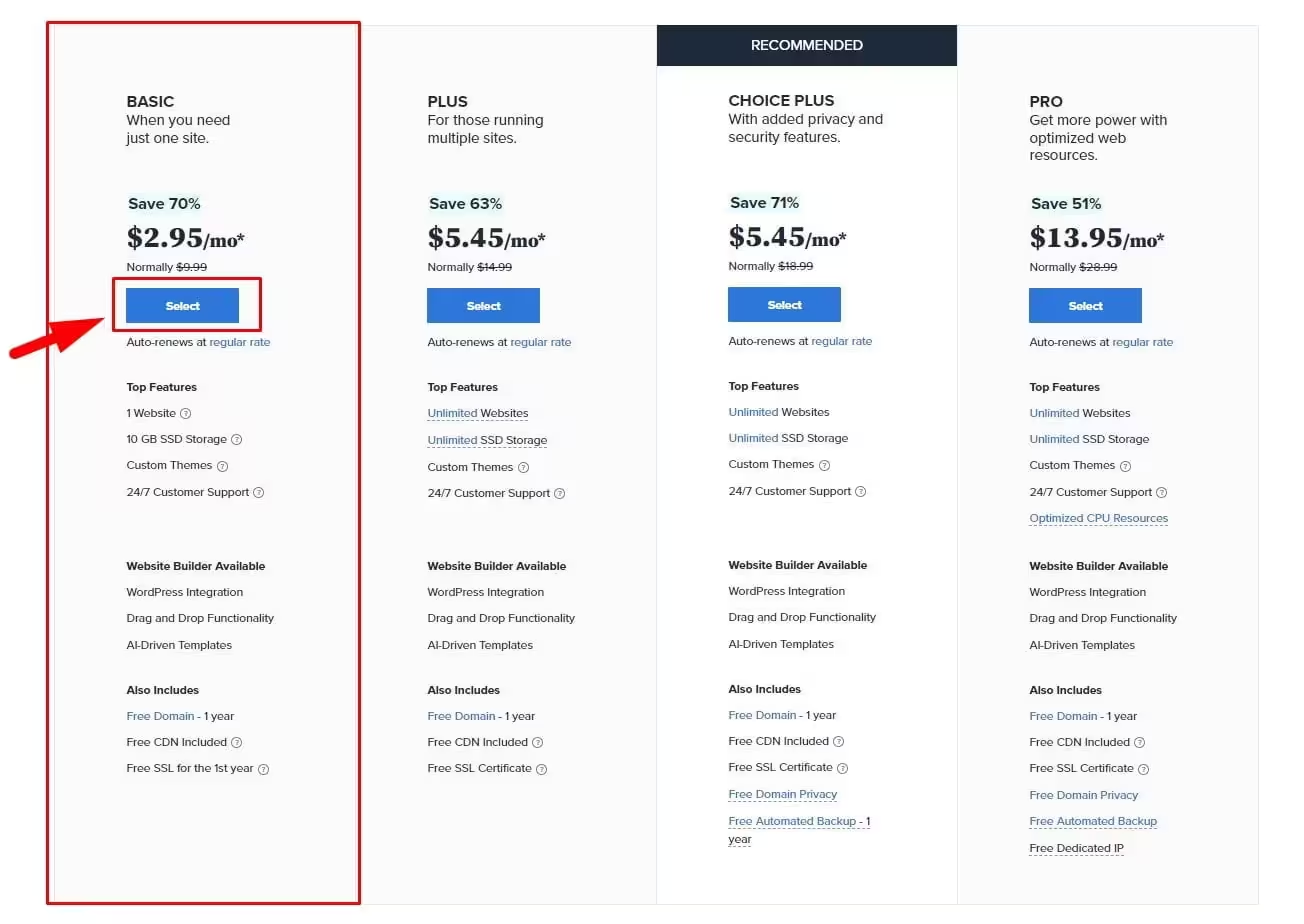
2. Select Your Desired Hosting Plan
Choose a hosting package perfect for all your needs of blogging.
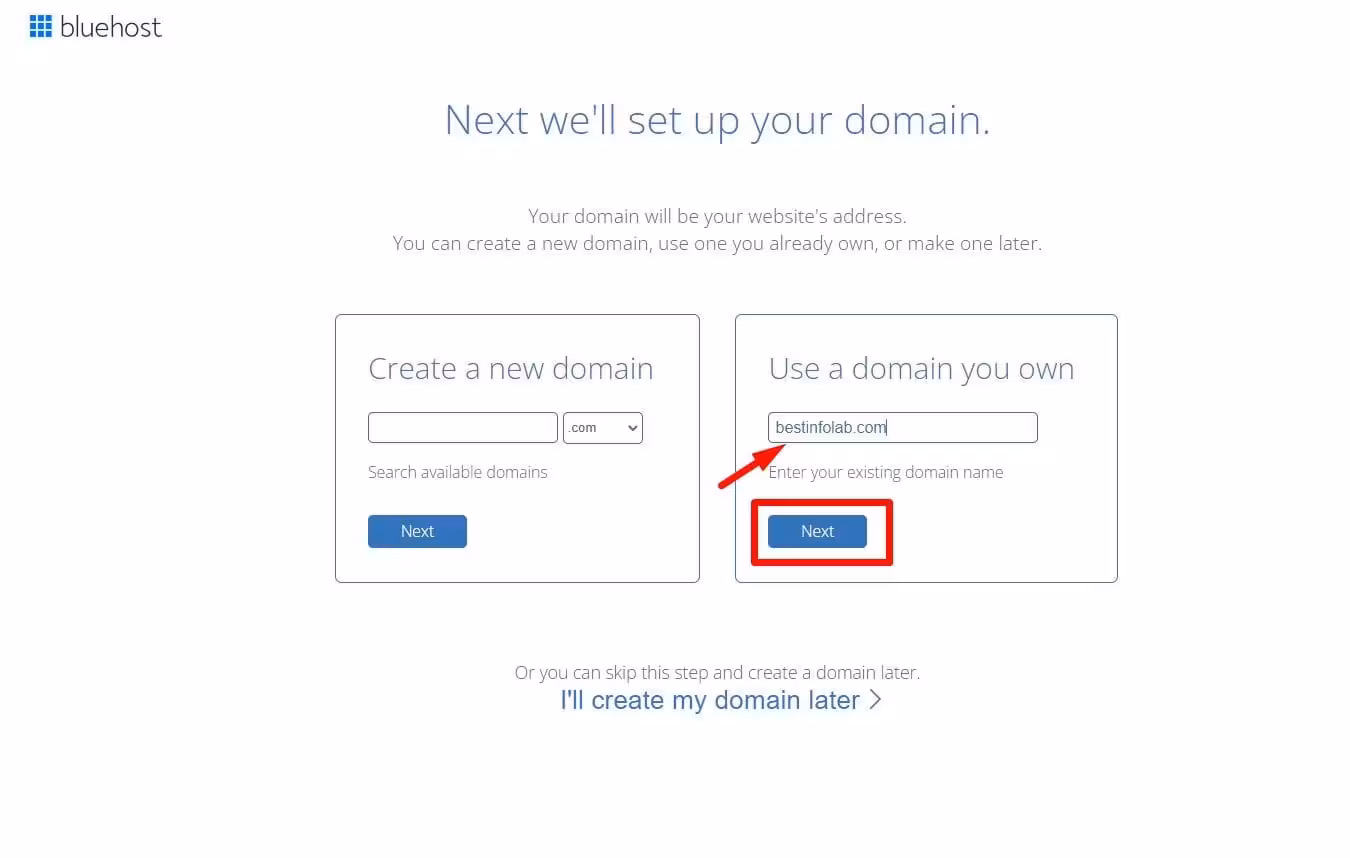
3. Enter Domain Name (You'll Get a Free Domain for 1 Year with Bluehost and Hostgator)
Choose a domain name that is simple to read, type, and remember.
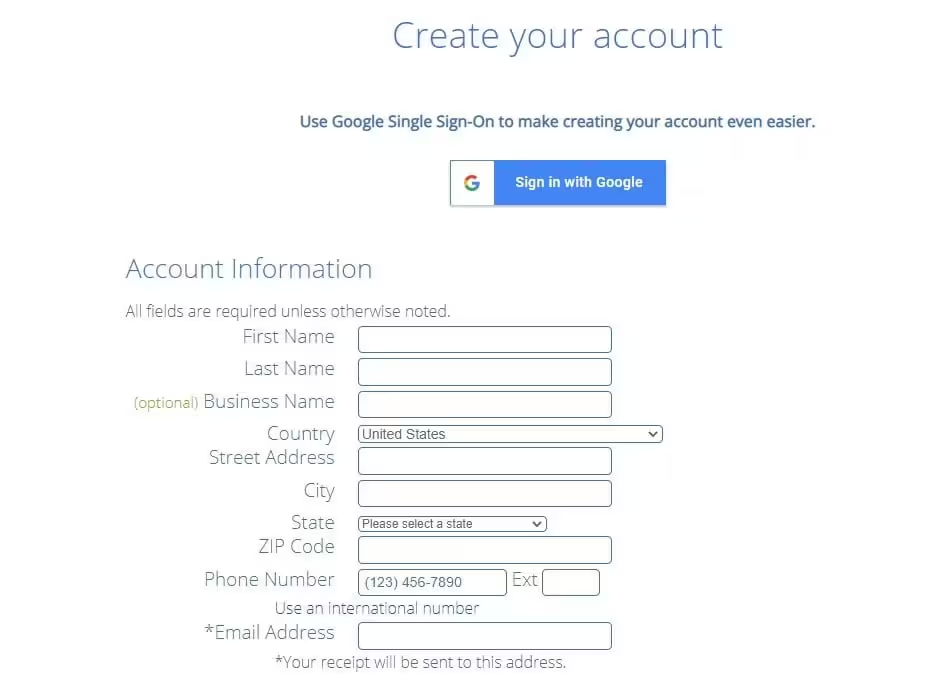
4. Enter Your Account Information
Simply provide your basic information, such as your name, address, and contact information.
Choose the Hosting Package you want buy
Click this special link to get the Bluehost discounted pricing for the BestInfoLab Readers.

Uncheck the package extras box, input your payment information, and then hit the submit button.
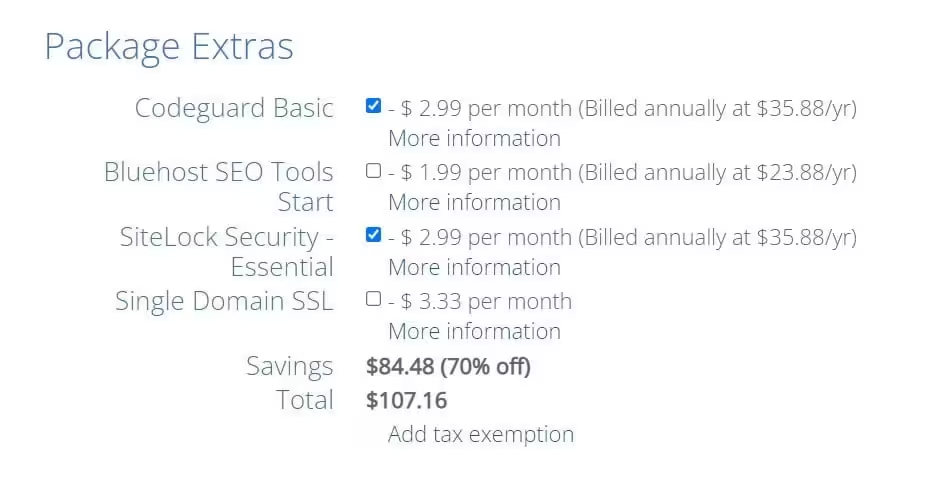
As you can see above you only charged for $35.40 for 1 year with our special link. Once you have completed the signup process with Bluehost, you’ll see the confirmation message like this.
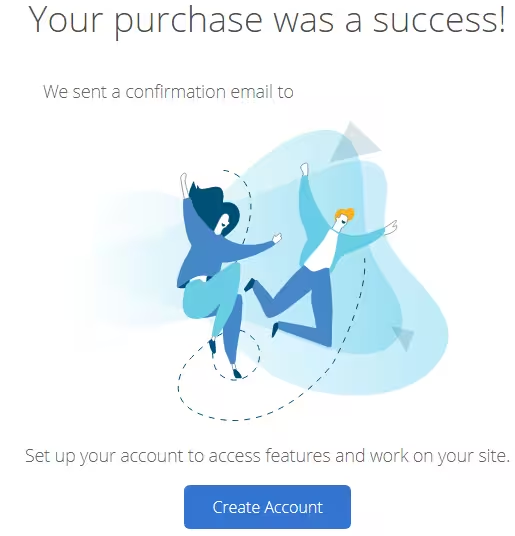
5. Set a Strong Password and Login
The next step is to sign up for a Bluehost account, which will get you access to the Bluehost cPanel.
Enter your domain name and choose a strong and secure password that includes alphabets, numbers, and symbols to make your password difficult to guess.
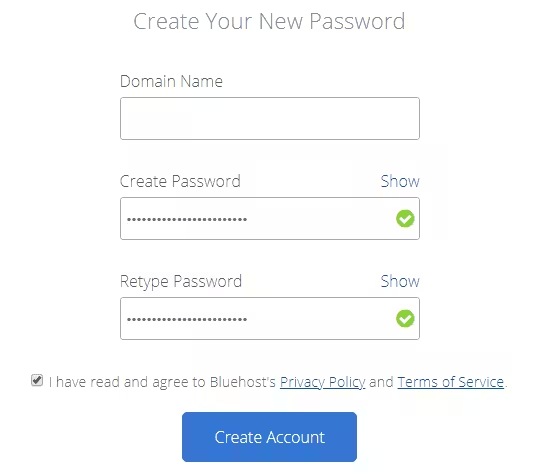
After you’ve successfully set your password, log in to your Bluehost account to install WordPress.
Log in with your domain name or email address and the password you just created above.

When you log in, you will see the Bluehost cPanel.

In the highlighted area, you will see a temporary address for your site, which will change to your domain address within a short period of time.
To install WordPress, click the WordPress button. Once WordPress has been installed, you may access your WordPress blog dashboard by going directly to domainname.com/wp-admin.
Consider how useful a WordPress site dashboard is.

Now you may design your blog whatever you like and start blogging.
Step 3: Pick a Simple Theme that Converts
A theme allows you to choose a design for your blog without requiring any coding or design ability. In other words, a decent theme helps you in designing your site precisely as you want it to appear.
If you’re not a developer (and I’m not), a theme will make your design job a million times simpler.

A basic yet professional theme is required when beginning a new blog. You should go for Elegant Themes, which costs $80 but gives you access to fantastic themes like Divi and page builders such as Divi Builder.
If you’re searching for a less expensive solution, consider GeneratePress Premium, which costs $59 per year you can also try ThemeForest. A convenient way to give a new look to your website without hardcore coding.
To get a professional-looking website make sure.
Don’t clog up your blog with adverts, at least not until you have a huge number of visitors.
Make use of as much white space as possible.
ThemeForest provides distinct themes; select the one that best meets your needs.
Make an investment in a logo. You can buy a good logo for $5 on Fiverr or employ someone (if you have the budget) you can try 99designs also
Make use of social sharing buttons to assist your visitors in spreading the word about your content. The nice thing about WordPress is that it offers a plethora of plugins (similar to tools) that you can install and use to complete your tasks. You might use a paid social sharing plugin such as Social Snap, Blog2Social.
Step 4: Set up SEO and Analytics
The following and most crucial step is to optimize your blog for search engines. This is critical since search engines are the source of organic traffic to your site.
Here are the measures you must do to optimize your blog for search engines.
1. Install SEO Plugin
You can use Yoast SEO for better SEO suggestions for blog posts. Or consider rank math. Rank Math is the most popular plugin for ensuring that your posts are SEO-optimized, assisting you in setting up search snippets and creating a sitemap for your blog.
It also includes a free version that is sufficient for newbies.
2. Add Google Analytics Code
The Google analytics code is the heart of your blog. It allows you to track your website visits and unique visitors at any moment. Much more than that, it shows you which pages attract the most traffic, what keywords bring you traffic, and plenty of other information about your visitors such as demographics, the device used to access your blog, and hobbies, among other things.
If you want to blog professionally, you must install Google Analytics on your site. Here is a video tutorial on how to install Analytics on your website.
3. Submit Your Site To Google Search Console
Google Search Console is a portal that allows you to manage your site, the site links that you wish to display, disavow bad backlinks, and so on.
Similarly, submit your blog to the webmaster tools of Bing and Yahoo. These aren’t required, but why leave even a tiny amount on the table?
4. Be on Social Media Platforms
This is crucial to building your brand’s presence and providing trust signals to your domain. Create a social media profile on Twitter, Facebook, or Instagram.
Step 5: Create Great Blog Content
Congratulations! You’ve started a blog, and now it’s time to…. actually blog. This is where the adventure begins.
Now that you’ve set up your blog, it will be blank, with nothing for your viewers to read. As a result, you’ll need content to show your readers. This content might provide your viewers a sense of what they can see from your blog and the first entries on the topic you’ll be writing about. Your initial blog posts would be classified into two categories:

1. The Essential Yet Vital Pages
This is a list of pages that practically every blog should contain. You must create a convincing about us page (see mine here) that includes your blog’s objective, team members, what readers may expect, and so on.
You must also include the following pages:
- Page dedicated to privacy policies
- Page of Contacts
- Any services page (if you provide them)
2. The Article that Sells (Posts)
This aspect of the writing process will continue as long as your blogging does. These are referred to as blog posts or entries. If you’ve never maintained a blog before, writing your first blog article might be daunting, but it doesn’t have to be difficult.
Here’s a step-by-step guide to effortlessly publishing your first blog item.
A few things to bear in mind when you develop a content plan to accompany your new blog launch announcement:
3. Make Sure You Have Enough Articles to Keep Your Visitors Happy
When you get the word out about your blog, you need to have enough posts so that people will stay for a while. It is recommended that you have at least 5 articles, but you can have as many as you like. The more the merrier!
Having a sufficient amount of content on the blog before releasing will Lower your bounce rates. Increase your business impact by demonstrating your subject-matter knowledge.
Also allow yourself ample time to concentrate on the next phase, which is promotion.
4. Develop A Pillar Post
Pillar posts are informative instructions on a certain topic. These postings are larger than others and should be focused on issue solving in your area. Prior to your debut, you should surely produce at least one pillar piece to demonstrate your authority in your field.
For instance, if you’re beginning a fashion blog, you might make a resource on the full guide to fashion photography or the complete guide to fashion basics.
5. Write Blog Posts That Drive Traffic to Your Website
Website traffic is another word for money in the blogging industry. The more traffic you have and the better targeted it is, the more money you will make. As a result, it is critical to provide content that both attracts and converts visitors.
You can’t do it manually, and there are plenty of tools available to help you do it faster and better. There is no better spot to get content ideas for your freshly launched website than competition research.
Semrush is a program that can help you uncover golden keywords that are simpler to rank and bank.
I’ve been using this program for a long time, and it has helped me transition from producing random things to creating pieces that are more focused.
6. How Can Semrush Help You Find Content Ideas For Your New Blog:

The next step is to enter any of your competition sites into the Semrush dashboard’s search field. Semrush responds quickly by providing you with all of the potential keywords that the site may be targeting, including sponsored (AdWords) keywords (remember seeing advertisements in search results? That is AdWords advertising).
This is the very technique I use to construct a content plan for all of my new blogs, and guess what? They rank higher and produce revenue faster than sites that lack a robust content or keyword strategy.

Things to Do Right Away After Starting a Blog
So you’ve successfully launched your WordPress blog. Congrats.
But here’s the catch. Your work isn’t finished. There are a few additional things you should do immediately after starting your blog to make it search engine and user friendly.
Here are the five things you should do as soon as you start your WordPress site.

1. Integrate Your Website With Google Analytics
You can’t establish a profitable website unless you watch its traffic and user behavior, right?
Google Analytics is a monitoring tool created by Google that provides you with all of the information you need to measure your website visits, user behavior, website bounce rates, and so on.
It’s absolutely free to use and can be quickly connected with your WordPress site using a Google embed code. If you’re not a computer whiz and prefer a much simpler solution, you may utilize a plugin like MonsterInsights’ Google Analytics.
2. Make a Sitemap
If you’ve just created a new website, you’ll need a sitemap. It is much simpler for search engine crawlers to examine the whole structure of your site and visit your site more effectively with such a sitemap.
Install the Google XML Sitemaps plugin, and it will handle everything for you, as it supports all types of WordPress-produced pages as well as custom URLs. If you use this plugin to generate a sitemap, you don’t need to do anything else, such as create sitemap files.
3. Install the Following WordPress Plugins
There are several caching plugins for WordPress, however the most popular and recommended are listed here.
You’ll need an SEO plugin to cover on-page SEO like meta title, meta description, focus keyword, keyword density, keyword optimization in subheadings, content readability etc. I like the RankMath plugin for it’s powerful built-in and complete schema solutions that generates structured data for Rich Result in Search Engine. So you don’t need to consider another plugin for schema.
Another feature of RankMath is Content AI. Content AI analyzes your content through their artificial intelligence for the better Ranking on Google. So you don’t need another tool for making your content SEO-friendly.
Yoast SEO is another popular plugin for SEO. You can use this plugin too for your SEO solution. But they don’t provide schema solution by default. You may consider another plugin for schema.
This is a paid WordPress caching plugin that we use on this site. You can utilize settings such as Lazy Load. It can improve both real and perceived loading times by loading pictures, iframes, and videos only when they are shown, reducing the number of HTTP requests.
You don’t need to worry about your page speed while WP Rocket has powerful built-in speed optimization technology. It will help you to achieve up to 100% performance and speed optimization score in Google Page Speed Insights.
It is the most popular caching plugin in the WordPress directory, and it may help you minimize download times by integrating with content delivery networks (CDNs). It also saves up to 80% of bandwidth by minifying and HTTP compressing HTML, CSS, JavaScript, and feeds.
Another popular caching plugin that is free to use. This plugin converts your dynamic WordPress blog into static HTML files. This is especially handy if your site is hosted on a limited bandwidth hosting environment, as this plugin allows static files to be loaded more rapidly.
4. Create Social Media Accounts
As soon as you install WordPress on your hosting, we recommend that you build social network profiles for your blog.
In reality, professional bloggers look for social media accounts first and only buy domains if they find unusual names. As a general guideline, your social media profiles should incorporate the name of your website.
For example, our site Best Info Lab has access to all social media profiles such as Facebook, Twitter, and others.
set up social networking profiles for Facebook, Twitter, Instagram, Pinterest, LinkedIn, Quora.
5. Simple But Important Changes for Your WordPress Dashboard
After installing WordPress and login into the dashboard, you’ll notice a variety of choices ranging from posts to media to comments to settings.
Here are the most significant modifications you should make from your WordPress dashboard to improve the search engine and user-friendliness of your site.
To begin, give your website a name. You may go to “Settings” and at the top of the page, you’ll notice two options for changing your site’s title and tagline. It appears to be like this-
Simply give your site a title and a slogan that best expresses what it is about.

6. Use the optimized Permalink structure
Optimizing your permalink structure is one of the most effective strategies to optimize your WordPress site (also known as URL structure). It allows you to simply optimize your major keywords for search engines while also making them easy to read for your audience.
To optimize permalink structure from your WordPress dashboard, navigate to Settings > Permalinks and explore the options there. There are several permalink structures available, including a custom option. It appears to be like this-

From the above Permalink options, “Post name” permalink structure is usually the best option, since it gives search engines like Google and your readers a clear idea of what your page is all about.
Whether you know it or not, Google truncates if it finds a lengthy URL in search results and that’s the reason why going for a shorter Permalink structure like “Post name” works best for most of the WordPress sites.
Blogging Tips to Improve Your Writing
We get a lot of questions asking how to blog, what to blog about, and how to create valuable material. The majority of this essay explained how to start a blog, but that is only the first step. It is now time to begin creating and posting your material.
Here are blogging suggestions for beginners.

1. Determine Your Ideal Readers
Once you’ve identified your specialty, you’ll need to determine who will be reading your site.
for instance, we deliver our insights about many digital products that might help beginners and small businesses. so our target audience is you.
If you want to write about your newborn baby’s development, that’s fantastic: your ideal readers will most likely be your relatives and family. It’s also OK if you wish to write about restoring old automobiles. Tailor your writing to your readers.
2. Research
Spend time studying the topic of your writing. We are able to include so many useful, relevant links in our articles because we take the time to investigate our subjects.
3. Deliver value not content
Your blog must give value to the lives of its readers. You wish to assist individuals in resolving issues. This is the only approach to attract high-quality users to your website (and keep them coming back).
The only way to gain someone’s long-term commitment is to offer value. Ask yourself, “Is this providing value?” with everything you write.
4. Be unique
Yes, there are other blogs regarding the same topic that you wish to write about. So, what defines your blog? Because of you, of course. You are what defines your blog. It’s about your point of view, your innovation, and the value you bring.
5. Be interesting
Create engaging blog entries. Especially if you want others to spread the word about it.
6. Transparency
Being transparent is not the same as being honest. You don’t have to reveal every element of your life simply to be honest.
Always be truthful and upfront when it adds worth to your writing.
7. Time
Once you’ve figured out how to establish a blog, you’ll realize that it takes a lot of time, especially if you’re as picky as we are.
However, after you’ve created your design, don’t fiddle with it too much. Instead, spend your energy on writing.
8. Vision
Because we have a wonderful host, a terrific theme, and, most importantly, we had a vision of how we wanted our blog to appear, our site design looks great. So always vision how you want thighs to work out at the end of the day.
9. Avoid negativity
Don’t say negatively or respond to anything negative. Remember your real visitors will never drag you down. But stay open to constructive criticism for improvement.
Step 6: How to Build A Blog That Makes $8317 per Month
Creating a six-figure income-generating blog is not a difficult task. You will mostly require two items:
- Increasing readership
- Making money from your audience
That being said, if you want a precise plan and blueprint for launching a blog that makes MONEY LIKE CRAZY, here are 6 tried and Tested steps for you. We have tried it so you don’t have to start from scratch.

Monetization Strategy
Have you decided how you want to monetize your website? Will you utilize affiliate marketing? Do you wish to sell online courses instead? You may simply follow a structure that helps you earn revenues from your blog if you create a monetization plan in advance.
That being said, there are a variety of income streams to consider when developing a monetization plan, and we’ll go through three of them shortly now.
1. Affiliate Products
Let me spill some beans. The majority of our blog money is derived from selling affiliate items. As a result, the majority of our monetization approach depends on the sale of affiliate items.
That is why we focus primarily on SEO and organic traffic, which converts significantly better than other traffic sources such as social media or referrals. If you’re searching for a way to generate money while you sleep, affiliate marketing is a terrific option.
2. Selling Your Own Products
Aside from affiliate marketing, there is another wonderful monetization tactic you may utilize. It is the sale of your own merchandise.
It might be anything, including eBooks, plugins, and tools. Selling online courses for sale is also a mind-boggling option. and guess what?
The list goes on.
3. Consulting
You may also monetize your blogs by providing consulting, private mentorships, or one-on-one consulting services.
The key to making more money from this type of monetization technique is to focus on building your personal brand. You should position yourself as an industry expert or opinion leader.
Don't Underestimate SEO
SEO is an acronym for Search Engine Optimization, and it refers to the process of optimizing your website for higher organic visibility. It helps you in attracting the ideal audience that are willing to buy from you.
Here are the three most important factors to consider when it comes to SEO.
- Content
- Keywords
- Backlinks
Diversify Income Sources
Don’t have all the hopes with one income source. Play with the options.try your luck in multiple platforms.
Have some helping tools
You can’t create a profitable blog without first investing money. To make money online, you must first invest money.
If you do that right, you can easily develop a profitable blog. Although there are many premium tools available, you should invest your money in the following areas.
Build & Grow Email List
Email marketing assists you in developing strong ties with your website’s audience. You’re making a massive blunder if you’re not building an email list.
So, from the start, make an effort to establish and increase your email list. Although there are other email marketing platforms available, we recommend that you use ConvertKit.
It is inexpensive and provides amazing functionality for growing your email list. It also includes tools such as tags and segments to help you manage your email subscribers and improve conversion rates. or you can go with GetResponse.
Reasons You Should Start a Blog
There are many personalized answers to this quest but here are some benefits that I have experienced myself as the journey of a blogger.
1. Best if you are a writer
Want to share your writing skill with the world then what better option do you have other than the blog in this digital era? And this makes writing so convenient as well. Just pick your niche and write. No publication is stopping you or telling you your words are not worth sharing.
2. You'll make new friends
You may be shocked at how fast you meet people online, whether through comments, emails, or social media. That is correct! Many of the most vital contacts I’ve formed over the last years have emerged from blog interactions.
3. Gain confidence
Blogging will benefit you in discovering greater confidence in your life. You will shortly discover that you live an important life, have a unique perspective, and have something to give people.” That is really true! Writing allows us to have a deeper understanding of our life and the significance of our choices.
FAQs on How to Start a Blog
How Much Does It Cost To Launch A Website On WordPress?
Launching a WordPress site is relatively simple and consists of three simple stages, which are as follows:
- Register a domain name
- Purchase hosting (we recommend Bluehost)
- Install WordPress on your hosting account.
That’s just how it is.
Now, let’s talk about how much it costs to set up a WordPress site. A year’s subscription costs roughly $35. (along with hosting, domain, etc).
How Do You Pick A Memorable Domain Name For Your Website?
It is difficult to come up with a memorable domain name. To be able to register a wonderful domain, you must examine several qualities of a good domain. You may also utilize programs like Panabee.com, Namemesh.com, Dot-o-mator.com, and others to generate a plethora of possibilities. You may also easily determine whether or not the domains are accessible.
How Do I Install WordPress On Bluehost?
It is really simple to install WordPress on Bluehost hosting. We’ve developed a simple step-by-step instruction for installing WordPress on Bluehost in a matter of minutes, complete with screenshots.
Final Thoughts
If you were wondering how to start your dream blog, I hope this step-by-step guide helped. There is no other way to have a successful blog launch than to follow these guidelines.
You’ve got this.
This is not a tough procedure. You just need to go through the processes one by one, and I’m confident you’ll get the hang of it.
If you have any worries or questions regarding how to make a profitable blog, please leave a comment below and I will help you start your dream site the proper way.
Browse More Resources About Starting A Profitable Blog If You are Really Interested in Blogging:

Priyanka Roy

Welcome to Best Info Lab – your ultimate destination for mastering the essential skills of blogging, SEO, and digital marketing. Our mission is to guide you on the journey to building a successful business and cultivating passive income streams that can replace traditional jobs.
At Best Info Lab, we believe in empowering individuals with the knowledge they need to achieve financial freedom and lead a more peaceful life. Dive into our rich repository of resources, where expert insights and actionable tips await you.
Join our community, where learning is made easy, and success becomes a shared goal. Embark on this transformative adventure with us, and take a significant step towards a brighter and more prosperous future!